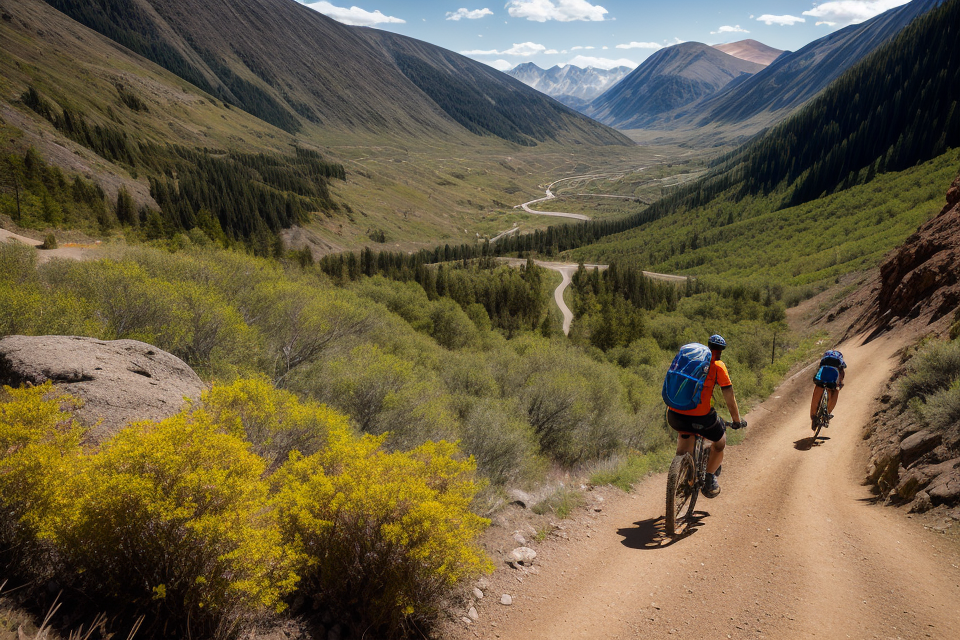
Bikepacking is an exciting adventure that involves cycling through diverse terrains while carrying all the necessary gear on your bike. One of the critical factors that can make or break your bikepacking trip is the weight distribution of your gear. Placing the weight correctly on your bike can help you pedal effortlessly, while a poor distribution can cause strain and fatigue. In this article, we will explore the optimal weight distribution for a successful bikepacking adventure. From packing light to balancing your load, we’ve got you covered. So, gear up and let’s hit the trails!
The optimal weight distribution for a successful bikepacking adventure depends on various factors such as the type of terrain, the duration of the trip, and the individual’s personal preferences. Generally, it is recommended to keep the weight centered around the bottom bracket of the bike, with heavier items placed towards the middle and lower part of the frame. This helps maintain the bike’s stability and handling while also minimizing the strain on the rider’s back and shoulders. However, the specific weight distribution may vary depending on the rider’s technique, equipment, and the conditions they will encounter during the ride. Ultimately, finding the optimal weight distribution requires experimentation and adaptation to individual needs and circumstances.
Understanding Bikepacking Weight Distribution
Factors Affecting Weight Distribution
The weight distribution of a bikepacking setup is a critical factor in determining the success of an adventure. It affects the bike’s handling, stability, and overall performance. Here are some of the key factors that affect weight distribution in bikepacking:
Frame materials
The frame material used in a bikepacking setup can significantly impact the weight distribution. Aluminum frames are typically lighter than steel or titanium frames, but they may not be as durable. Steel frames are strong and durable but tend to be heavier than aluminum frames. Titanium frames are lightweight and durable, making them a popular choice for bikepacking.
Tire size and pressure
The tire size and pressure also play a significant role in weight distribution. Larger tires will weigh more, but they may provide better traction and shock absorption. Lower tire pressure can improve traction and comfort, but it can also affect the bike’s stability and increase the risk of punctures.
Rider’s weight and position
The rider’s weight and position on the bike can also impact weight distribution. A heavier rider may require a sturdier frame and components to support their weight. The rider’s position on the bike can also affect weight distribution, with a more aggressive position potentially shifting the weight further forward.
Equipment choice and quantity
The equipment chosen for a bikepacking adventure can also impact weight distribution. Heavier items such as a heavy tent or a large stove will shift the weight of the bike further back. The quantity of equipment also plays a role, with a larger quantity of equipment potentially shifting the weight further back.
Overall, achieving optimal weight distribution in a bikepacking setup requires careful consideration of these factors. A well-balanced setup will provide better handling, stability, and overall performance, allowing the rider to focus on the adventure rather than the bike.
Balancing Weight for Optimal Performance
Properly balancing the weight distribution on a bike is crucial for a successful bikepacking adventure. The weight distribution should be evenly distributed between the front and rear wheels to ensure stability and control. This can be achieved by carefully selecting the right frame size and components that are suitable for the rider’s height and weight.
Selecting appropriate tires is also important for weight distribution. The tires should be chosen based on the terrain and the load capacity of the bike. It is important to prioritize essential equipment and leave non-essential items behind to reduce the overall weight of the bike.
In addition to the above, it is important to ensure that the weight distribution is balanced between the front and rear wheels. This can be achieved by using a rear rack that is designed to distribute the weight evenly. The front end of the bike should also be balanced with the use of a properly sized handlebar and stem.
It is also important to consider the weight of the rider when balancing the weight distribution. A heavier rider will require a stronger frame and components that can support their weight. It is important to choose components that are rated for the rider’s weight to ensure safety and stability.
Overall, balancing the weight distribution on a bike is crucial for a successful bikepacking adventure. Properly selecting the right frame size and components, choosing appropriate tires, prioritizing essential equipment, and ensuring that the weight is balanced between the front and rear wheels are all important factors to consider when balancing weight for optimal performance.
The Importance of Frame Material
Choosing the Right Frame Material for Your Bikepacking Adventure
When it comes to choosing the right frame material for your bikepacking adventure, there are several options to consider. Each material has its own set of benefits and drawbacks, and the best choice will depend on your specific needs and preferences.
Carbon Fiber
Carbon fiber is a popular choice for bike frames due to its high strength-to-weight ratio. This means that carbon fiber frames are very lightweight while still being able to support a significant amount of weight. They are also very stiff, which can help with handling and responsiveness. However, carbon fiber frames can be quite expensive and may not be as durable as other materials.
Aluminum
Aluminum is another popular choice for bike frames. It is relatively lightweight and strong, and is often less expensive than carbon fiber. Aluminum frames are also very durable and can withstand a lot of wear and tear. However, they may not be as stiff as carbon fiber frames, which can affect handling.
Steel
Steel frames are known for their durability and comfort. They are often heavier than other materials, but they can absorb more impact and vibrations, which can make for a smoother ride. Steel frames are also generally more affordable than carbon fiber or aluminum frames. However, they may not be as stiff or responsive as other materials.
Titanium
Titanium is a lightweight and strong material that is often used for high-end bike frames. It is very durable and can withstand a lot of wear and tear. Titanium frames are also very comfortable, as they can absorb vibrations and provide a smooth ride. However, they can be quite expensive and may not be as stiff as other materials.
Ultimately, the best frame material for your bikepacking adventure will depend on your specific needs and preferences. Consider factors such as weight, strength, durability, stiffness, and cost when making your decision.
Advantages and Disadvantages of Different Frame Materials
Carbon Fiber
- Lightweight
- Durable
- Expensive
Carbon fiber is a popular choice for bike frames due to its combination of light weight and durability. It is made from a polymer that is reinforced with thin strands of carbon fiber, making it strong and lightweight. This material is often used in high-end road bikes and mountain bikes. However, the high cost of carbon fiber frames can be a significant drawback for some riders.
Aluminum
- Affordable
- Less durable than carbon fiber
Aluminum is another popular choice for bike frames due to its light weight and affordability. It is a popular alternative to carbon fiber for riders who want a more budget-friendly option. While aluminum frames are not as strong or durable as carbon fiber frames, they can still provide a good balance of strength and weight.
Steel
- Strong
- Heavy
Steel is a traditional material for bike frames and is known for its strength and durability. Steel frames are often used in hybrid bikes and some mountain bikes. However, they are typically heavier than other materials, which can affect the overall weight distribution of the bike.
Titanium
Titanium is a strong and lightweight material that is often used in high-end mountain bikes and road bikes. It is known for its durability and resistance to corrosion, making it a popular choice for riders who want a long-lasting frame. However, titanium frames are often expensive, which can be a drawback for some riders.
In conclusion, the choice of frame material can greatly impact the weight distribution of a bike and ultimately affect the success of a bikepacking adventure. Riders must consider their budget, the type of terrain they will be riding on, and their personal preferences when choosing a frame material.
Frame Material and Weight Distribution
When it comes to choosing the right frame material for your bikepacking adventure, it’s important to consider the weight distribution of your gear and your body. A well-distributed weight can improve the handling and stability of your bike, making it easier to ride and reducing the risk of accidents.
To achieve optimal weight distribution, it’s important to properly size your frames and components. This means choosing a frame that is the right size for your body and selecting components that are appropriate for your riding style and terrain. A properly sized frame will ensure that your weight is distributed evenly across the bike, improving its handling and stability.
In addition to properly sizing your frames and components, it’s also important to choose a frame material that can handle the weight of your gear and your body. Different frame materials have different strength-to-weight ratios, meaning that some are better suited to carrying heavy loads than others.
Aluminum frames, for example, are lightweight and strong, making them a popular choice for bikepacking. However, they may not be as durable as steel or titanium frames in the long run. Steel frames, on the other hand, are incredibly strong and durable, but they can be heavier than aluminum frames.
Ultimately, the right frame material for your bikepacking adventure will depend on your personal preferences and the specific demands of your trip. Consider your budget, your riding style, and the terrain you’ll be riding on when making your decision.
Tire Size and Pressure
Choosing the Right Tire Size for Your Bikepacking Adventure
When it comes to choosing the right tire size for your bikepacking adventure, there are a few factors to consider. The most important factors are the terrain you’ll be riding on, the load capacity of your bike, and your personal preferences.
Mountain bike vs. gravel bike vs. road bike tires
Mountain bike tires are typically wider and have more tread pattern than road bike tires, which makes them better suited for off-road terrain. Gravel bike tires are a middle ground between mountain bike and road bike tires, with a more aggressive tread pattern than road bike tires but not as aggressive as mountain bike tires. Road bike tires are narrow and have a smooth tread pattern, making them better suited for paved roads.
Sizing based on terrain and load capacity
When choosing the right tire size for your bikepacking adventure, it’s important to consider the terrain you’ll be riding on. If you’ll be riding on rough terrain, you’ll want a wider tire with a more aggressive tread pattern. If you’ll be riding on smoother terrain, you can opt for a narrower tire with a smoother tread pattern.
Load capacity is also an important factor to consider when choosing the right tire size. If you’ll be carrying a heavy load, you’ll want to choose a tire that can handle the extra weight. Wider tires with a more aggressive tread pattern are generally better suited for carrying heavy loads.
It’s also important to consider your personal preferences when choosing the right tire size. Some riders prefer wider tires for a more comfortable ride, while others prefer narrower tires for a faster ride. Ultimately, the right tire size for your bikepacking adventure will depend on your personal preferences, the terrain you’ll be riding on, and the load capacity of your bike.
Adjusting Tire Pressure for Optimal Performance
When it comes to bikepacking, having the right tire pressure is crucial for a successful and enjoyable adventure. Overinflated tires can cause a rough ride and increased risk of punctures, while underinflated tires can lead to pinch flats and reduced traction.
Adjusting tire pressure to suit the terrain and load is a critical aspect of optimal performance. Different types of terrain require different tire pressures to ensure the best possible performance. For example, when riding on smooth pavement, lower tire pressure can provide better grip and shock absorption, while higher tire pressure is necessary for rougher terrain to prevent punctures and increase resistance to pinch flats.
Additionally, the weight of the load being carried also affects tire pressure. A heavier load requires higher tire pressure to maintain stability and prevent flats. On the other hand, a lighter load can allow for lower tire pressure, which can improve traction and shock absorption.
It is important to note that the risk of underinflation and overinflation is high, and the consequences can be severe. Underinflation can cause the tire to squirm and feel unstable, while overinflation can lead to a rough ride and increased risk of punctures. To avoid these risks, it is important to check tire pressure regularly and adjust as necessary.
The Impact of Tire Size and Pressure on Weight Distribution
Selecting the right tire size and maintaining the appropriate tire pressure is crucial for optimal weight distribution during a bikepacking adventure. It ensures that your bike handles the weight of your gear effectively, maintains traction, and offers a comfortable riding experience.
- Selecting tires that fit your frame and can handle the weight of your gear: It is essential to choose tires that are compatible with the frame of your bike and can withstand the weight of your gear. Consider the size and width of the tires, as well as their intended use, such as whether they are designed for on-road or off-road terrain. Ensure that the tires are not too narrow or too wide for your bike, as this can affect handling and stability.
- Balancing tire pressure with the weight of your gear and your body: The tire pressure you choose should be appropriate for the weight of your gear and your body. Overinflating your tires can lead to a harsh ride and reduced traction, while underinflating them can cause flat tires and loss of control. A general rule of thumb is to inflate your tires to 1.5 to 2 times the recommended pressure for the weight of your bike and rider, plus the weight of your gear. For example, if your bike and rider weigh 200 pounds, and you are carrying 100 pounds of gear, you would aim for a tire pressure between 70 and 90 pounds per square inch (psi). It is essential to monitor and adjust your tire pressure regularly throughout your bikepacking adventure, as weather conditions, terrain, and the weight of your gear can all impact the ideal pressure.
Rider’s Weight and Position
Managing Your Weight for Optimal Performance
Effective weight management is crucial for a successful bikepacking adventure. To ensure optimal performance, consider the following strategies for managing your weight:
- Losing excess weight before the trip:
- Reducing overall body weight prior to the bikepacking adventure can significantly improve your performance and endurance.
- By shedding excess pounds, you will experience less strain on your body and enjoy enhanced mobility on the bike.
- A balanced diet, regular exercise, and smart meal planning can help you reach your target weight for optimal performance.
- Distributing weight evenly between front and rear wheels:
- Ensuring a balanced weight distribution between the front and rear wheels is essential for maintaining stability and control during the ride.
- An ideal weight distribution will prevent handling issues and reduce the risk of accidents or mishaps during the bikepacking adventure.
- Proper weight distribution can be achieved by carefully packing and organizing gear, placing heavier items strategically, and using appropriate rack systems for your bike.
- Front and rear racks should be securely attached, and the weight should be distributed in a way that allows for comfortable steering and braking.
- Consider using weight distribution tools, such as chain stays or fork bridges, to help distribute weight evenly and prevent overloading one side of the bike.
- Be mindful of the weight limits of your bike and avoid overloading it, as this can lead to mechanical issues and negatively impact your performance.
- Proper weight distribution can make a significant difference in your overall riding experience and enhance your success during the bikepacking adventure.
Adjusting Your Riding Position for Comfort and Control
Proper adjustment of your riding position is crucial for both comfort and control during a bikepacking adventure. Here are some tips for adjusting your saddle height and fore-aft position, as well as your handlebar height and reach.
Adjusting the Saddle Height and Fore-Aft Position
Your saddle height should be adjusted so that your leg is almost fully extended when the pedal is at its lowest point. This will help you maintain proper pedaling technique and avoid knee pain. Additionally, your fore-aft position should be adjusted so that your knees are slightly bent when the pedals are at their lowest point. This will help you maintain control over the bike and absorb shock.
To adjust the saddle height, use a measuring tape to measure the distance from the center of the bottom bracket to the top of the saddle. Adjust the saddle height until it is at the correct height for your leg length and pedaling style.
To adjust the fore-aft position, use a tape measure to measure the distance from the center of the bottom bracket to the center of the saddle. Adjust the fore-aft position until it is at the correct distance for your leg length and pedaling style.
Adjusting the Handlebar Height and Reach
Your handlebar height should be adjusted so that your hands are in a comfortable position on the handlebars, with your wrists slightly bent. This will help you maintain control over the bike and reduce hand fatigue. Additionally, your handlebar reach should be adjusted so that your arms are almost fully extended when you are in a normal riding position. This will help you maintain proper posture and avoid shoulder and neck pain.
To adjust the handlebar height, use a measuring tape to measure the distance from the center of the bottom bracket to the top of the handlebars. Adjust the handlebar height until it is at the correct height for your arm length and riding style.
To adjust the handlebar reach, use a tape measure to measure the distance from the center of the bottom bracket to the center of the handlebars. Adjust the handlebar reach until it is at the correct distance for your arm length and riding style.
By adjusting your riding position for comfort and control, you can improve your bikepacking adventure and enjoy the ride.
The Impact of Rider’s Weight and Position on Weight Distribution
Maintaining the correct weight distribution is essential for a successful bikepacking adventure. The rider’s weight and position play a crucial role in achieving this balance. Here are some key factors to consider:
- Properly sizing frames and components for the rider’s height and weight: The frame and components of the bike must be appropriately sized for the rider’s height and weight. A bike that is too small or too large can cause imbalances in weight distribution, affecting the handling and performance of the bike. For instance, a bike that is too small may not provide enough stability, while a bike that is too large may be difficult to control.
- Ensuring the rider’s position allows for proper weight distribution: The rider’s position on the bike also affects weight distribution. A good position should place the rider’s weight evenly on the saddle and allow for proper body alignment. This can help distribute the weight evenly across the bike, improving handling and reducing fatigue. Additionally, a comfortable and efficient riding position can help the rider maintain focus and endurance during long rides.
It is important to note that the optimal weight distribution may vary depending on the specific bikepacking route and the rider’s individual preferences. However, by paying attention to the rider’s weight and position, cyclists can ensure that their bike is properly balanced and ready for any terrain or challenge that may arise.
Equipment Choice and Quantity
Selecting Essential Equipment for Your Bikepacking Adventure
When it comes to selecting essential equipment for your bikepacking adventure, it’s important to strike a balance between bringing necessary items for safety and navigation, as well as items for comfort and convenience. Here are some key considerations to keep in mind when selecting essential equipment:
- Necessary items for safety and navigation
- Navigation tools: A map, compass, and GPS device are essential for navigating unfamiliar terrain and staying on course. It’s important to have a backup navigation tool in case one fails, so bring extra batteries or a paper map as a backup.
- Lighting: Good lighting is crucial for riding in low-light conditions, whether it’s early mornings or late evenings. Bring a front light and a rear light that are visible from at least 500 feet away.
- Clothing: Depending on the weather and terrain, you may need to bring additional layers of clothing to stay warm and dry. Consider bringing a waterproof jacket, insulated layers, and extra socks.
- First aid kit: A basic first aid kit should include bandages, gauze, adhesive tape, tweezers, scissors, and any personal medications you may need. It’s also a good idea to bring a few extra adhesive bandages and a pair of gloves.
- Repair kit: A repair kit should include tools for fixing flat tires, replacing broken parts, and making minor adjustments to your bike. Bring a multi-tool, tire patches, and a pump or CO2 cartridges.
- Hydration system: Staying hydrated is essential for maintaining energy levels and avoiding dehydration. Bring a water bottle or hydration system that can hold at least 2 liters of water.
- Food: Bring enough food to sustain you for the duration of your ride, including snacks and meals. Consider bringing high-energy foods like granola bars, energy gels, and trail mix.
- Items for comfort and convenience
- Sleeping bag or blanket: Depending on the length of your trip, you may need to bring a sleeping bag or blanket for camping. Consider bringing a lightweight, compact bag that can be easily carried on your bike.
- Shelter: If you’re camping, you’ll need a shelter to protect you from the elements. Consider bringing a lightweight tent or tarp that can be easily set up and taken down.
- Personal hygiene items: Bring personal hygiene items like toothbrush, toothpaste, biodegradable soap, and hand sanitizer. Consider bringing a portable water filter or purifier to ensure you have access to clean drinking water.
- Communication devices: Bring a mobile phone or satellite phone for emergency communication. Consider bringing a two-way radio or a messaging device for non-emergency communication with your support crew or fellow riders.
- Camera: Depending on your interests, you may want to bring a camera to capture photos and videos of your adventure. Consider bringing a lightweight, compact camera or a smartphone with a good camera.
Remember, the key to selecting essential equipment is to bring only what you need and nothing more. Overpacking can make your bike harder to manage and can slow you down. Take the time to research and plan your equipment needs based on the length, terrain, and weather conditions of your bikepacking adventure.
Prioritizing Essential Equipment over Non-Essential Items
When it comes to bikepacking, it’s important to prioritize essential equipment over non-essential items. This means reducing the weight and bulk of non-essential items while ensuring that the essentials are high quality and reliable. Here are some tips for prioritizing essential equipment:
- Assess your needs: Before setting out on your bikepacking adventure, take some time to assess your needs. Consider the length of your trip, the terrain you’ll be riding on, the weather conditions, and any potential emergencies that could arise. Make a list of the essentials you’ll need to bring with you.
- Minimize non-essential items: Once you have your list of essentials, go through your gear and identify any non-essential items. These might include items like extra clothing, books, or other personal items that you don’t absolutely need for your trip. Consider leaving these items behind or packing them in a separate bag that you can access when you reach your destination.
- Choose high-quality, reliable gear: When it comes to essential items, it’s important to choose high-quality, reliable gear. This means investing in gear that is durable, well-made, and designed for the specific conditions you’ll be riding in. For example, if you’re planning a trip in a hot, dry climate, choose a high-quality water bottle that is designed to keep your water cold. If you’re planning a trip in a cold, wet climate, choose a high-quality jacket that is designed to keep you warm and dry.
- Pack smart: Once you have your list of essentials and have minimized non-essential items, it’s time to pack smart. Consider the weight and bulk of each item you’re packing, and try to pack them in a way that allows you to access them easily while riding. For example, consider packing your sleeping bag and tent in a separate bag that you can easily access when you set up camp.
By prioritizing essential equipment over non-essential items, you can ensure that you have the gear you need for a successful bikepacking adventure while also reducing the weight and bulk of your gear. This will allow you to focus on the ride and enjoy the beauty of the great outdoors.
The Impact of Equipment Choice and Quantity on Weight Distribution
- Selecting gear that is compatible with the weight capacity of your bike
- Ensuring an even distribution of weight between the front and rear wheels
Proper equipment choice and quantity play a crucial role in determining the weight distribution of your bike during a bikepacking adventure. To ensure a successful and comfortable journey, it is essential to select gear that fits within the weight capacity of your bike. This means that you must carefully consider the weight of each piece of equipment you plan to bring along, and choose items that can be easily carried without exceeding the weight limit of your bike.
Additionally, it is important to distribute the weight of your equipment evenly between the front and rear wheels. This can be achieved by carefully selecting items that are well-balanced and proportionate in size, and ensuring that the heaviest items are placed in the appropriate locations on your bike. An uneven distribution of weight can cause handling issues, such as instability or difficulty steering, and may make it more difficult to control your bike during the journey.
By taking the time to carefully consider your equipment choices and the quantity of gear you plan to bring, you can ensure that your bike is properly balanced and prepared for a successful bikepacking adventure. This will not only make your journey more enjoyable, but will also help to prevent any unnecessary strain or discomfort on your body during the ride.
FAQs
1. What is bikepacking?
Bikepacking is a type of cycling that involves carrying equipment and supplies on a bicycle for multi-day trips, often in remote or off-road locations. It is a self-supported form of cycling that requires both physical and mental endurance.
2. Why is weight distribution important in bikepacking?
Weight distribution is important in bikepacking because it affects the handling and performance of the bicycle. A poorly distributed weight can cause the bike to handle poorly, making it difficult to control, especially on rough terrain. It can also cause discomfort and fatigue for the rider, making the journey less enjoyable.
3. What are the factors to consider when distributing weight on a bike?
When distributing weight on a bike, several factors need to be considered, including the type of terrain, the weight of the equipment and supplies, the rider’s weight and height, and the frame and fork of the bicycle. The weight should be distributed evenly between the front and rear wheels, with the heaviest items placed as close to the center of the bike as possible.
4. How much weight can a bike carry for bikepacking?
The amount of weight a bike can carry for bikepacking depends on several factors, including the strength and quality of the frame and components, the rider’s fitness level, and the terrain. Generally, a bike can carry a weight of around 20-30% of the rider’s body weight, but this can vary depending on the specific circumstances.
5. How do I determine the optimal weight distribution for my bikepacking adventure?
To determine the optimal weight distribution for your bikepacking adventure, start by weighing all of your equipment and supplies. Then, distribute the weight evenly between the front and rear wheels, with the heaviest items placed as close to the center of the bike as possible. Consider the type of terrain you will be riding on and adjust the weight distribution accordingly. Finally, take a test ride to ensure that the weight distribution feels comfortable and the bike handles well.