Bikepacking is an exciting and adventurous activity that combines the thrill of cycling with the freedom of camping. Whether you’re a seasoned cyclist or a beginner, physical preparation is crucial to ensure a safe and enjoyable trip. In this article, we’ll explore the essential tips and tricks for how to physically prepare for bikepacking. From building endurance to packing the right gear, we’ll cover everything you need to know to get ready for your next bikepacking adventure. So, gear up and let’s get started!
Understanding Bikepacking
What is Bikepacking?
Bikepacking is a type of cycling that involves carrying all the necessary gear and equipment on one’s bicycle to explore remote and rugged terrain. It combines the physical exertion of cycling with the thrill of camping and adventure. Unlike traditional cycling, bikepacking involves a mix of paved and unpaved roads, as well as off-road trails, and often requires the rider to navigate through challenging terrain such as mountains, forests, and deserts.
In essence, bikepacking is a way to explore the outdoors on two wheels, immersing oneself in nature while pushing physical and mental limits. It’s a unique and rewarding experience that offers a sense of freedom and self-reliance, as well as an opportunity to connect with the natural world. Whether it’s a weekend trip or a multi-day adventure, bikepacking can be an exhilarating and fulfilling way to experience the great outdoors.
Why Physical Preparation is Important for Bikepacking
Physical preparation is a crucial aspect of bikepacking, which is a type of cycling that involves carrying gear and camping equipment on a bicycle. Bikepacking trips can range from a few days to several weeks, and they often take place in remote areas where help may not be easily accessible. As such, it is essential to be physically prepared for the demands of the trip to ensure safety and enjoyment.
Importance of Physical Preparation
Physical preparation is essential for bikepacking because it helps to build endurance, strength, and overall fitness. Cycling, especially over long distances, can be physically demanding, and being physically prepared can help to reduce the risk of injury and fatigue. It also allows you to enjoy the trip more fully, as you will have the energy and stamina to explore and enjoy the beautiful landscapes that bikepacking offers.
Risks of Inadequate Preparation
Inadequate physical preparation for bikepacking can lead to a range of problems, including fatigue, muscle soreness, and injury. It can also affect your ability to enjoy the trip, as you may struggle to keep up with your group or to fully appreciate the beauty of the landscape. In extreme cases, inadequate preparation can even lead to serious health problems, such as heat exhaustion or dehydration.
Therefore, it is important to take the time to prepare for a bikepacking trip by building up your endurance and strength through regular exercise and training. This can include cycling, of course, but also other activities such as running, swimming, and strength training. By taking the time to prepare, you can ensure that you are physically ready for the demands of the trip and can fully enjoy the experience.
Physical Preparation for Bikepacking
Setting Realistic Goals
Before embarking on a bikepacking adventure, it’s crucial to set realistic goals that align with your fitness level and overall physical preparedness. This ensures that you can safely and enjoyably complete your ride while minimizing the risk of injury or exhaustion. Here are some tips for setting realistic goals for your bikepacking trip:
Assessing Your Fitness Level
Before setting any goals, it’s important to assess your current fitness level. This can be done by performing a simple test such as a 5-mile time trial or a basic fitness test that measures your heart rate at various intensities. Once you have a baseline measurement of your fitness, you can use this information to determine what kind of rides are within your capabilities and what kind of training you need to do to reach your goals.
Setting SMART Goals
When setting goals for your bikepacking trip, it’s important to make them SMART: Specific, Measurable, Achievable, Relevant, and Time-bound. Here are some examples of SMART goals for bikepacking:
- Specific: Ride 100 miles in a day
- Measurable: Increase your average speed by 5 mph
- Achievable: Ride 500 miles in a month
- Relevant: Complete a century ride in under 6 hours
- Time-bound: Train for a 100-mile race in 12 weeks
Remember, your goals should be challenging but achievable. Setting unrealistic goals can lead to frustration and burnout, which can negatively impact your training and overall enjoyment of the sport.
Creating a Training Plan
Once you have set your goals, it’s time to create a training plan that will help you achieve them. This should include a mix of endurance training, strength training, and technical skills practice. Be sure to include rest days and recovery time in your plan to avoid overtraining and injury.
Additionally, consider incorporating cross-training activities such as running, hiking, or yoga to improve your overall fitness and reduce the risk of overuse injuries.
In conclusion, setting realistic goals is a crucial step in preparing for a bikepacking trip. By assessing your fitness level, setting SMART goals, and creating a comprehensive training plan, you can ensure that you are physically prepared for the challenges of your adventure.
Building Endurance
When it comes to bikepacking, endurance is key. It doesn’t matter how skilled you are at technical aspects of cycling, if you can’t sustain your energy and effort over long distances, you’ll struggle to enjoy the experience. Here are some tips to help you build the endurance you need for bikepacking:
- Building Cardiovascular Endurance: Cardiovascular endurance is the ability of your heart, lungs, and blood vessels to supply oxygen to your muscles during sustained physical activity. The best way to build cardiovascular endurance is to engage in regular aerobic exercise, such as cycling, running, or swimming. Start with shorter sessions and gradually increase the duration and intensity over time.
- Building Muscular Endurance: Muscular endurance is the ability of your muscles to perform repeated contractions without fatiguing. To build muscular endurance, you need to perform resistance training exercises that target the muscles used in cycling, such as leg press, squats, and lunges. You can also use resistance bands or bodyweight exercises like push-ups and planks. It’s important to start with lighter weights or lower resistance and gradually increase the load as you become stronger.
In addition to building endurance, it’s also important to focus on flexibility and mobility training to prevent injury and improve your range of motion on the bike. Stretching and yoga are great ways to improve flexibility and mobility, while strength training can help prevent injury and improve overall fitness.
Building Strength
As you prepare for your bikepacking adventure, building strength is essential to help you power through tough terrain and long days in the saddle. Here are some tips to help you build the muscular strength needed for bikepacking:
Muscular Strength
- Resistance Training: Incorporate resistance training exercises such as squats, deadlifts, lunges, and calf raises into your workout routine. These exercises target the legs, glutes, and core muscles, which are essential for bikepacking.
- Interval Training: Try high-intensity interval training (HIIT) workouts that involve short bursts of intense exercise followed by periods of rest. This type of training can help you build muscular endurance and improve your power output on the bike.
- Free Weights: Incorporate free weight exercises such as bicep curls, tricep extensions, and shoulder presses into your routine. These exercises can help build strength in your arms and shoulders, which are important for maintaining control and balance on the bike.
Core Strength
- Plank: Practice plank exercises to build core strength and stability. Holding a plank position for 30 seconds to a minute at a time can help strengthen your core muscles, which are essential for maintaining good posture and balance on the bike.
- Russian Twists: Russian twists are a great exercise for targeting the obliques, which are important for maintaining a strong and stable core while riding.
- Side Plank: Side planks are another effective exercise for building core strength and stability. Holding a side plank for 30 seconds to a minute on each side can help strengthen the muscles that support your spine and stabilize your core.
Remember to incorporate strength training into your routine gradually, starting with lighter weights and higher reps and gradually increasing the weight and decreasing the reps as you build strength. This will help prevent injury and ensure that you’re challenging yourself without overdoing it.
Stretching and Flexibility
Importance of Stretching
Stretching is a crucial aspect of physical preparation for bikepacking. It helps to improve flexibility, reduce the risk of injury, and increase range of motion. Stretching before and after bikepacking trips can also help to prevent muscle soreness and stiffness.
Stretching Techniques for Bikepacking
- Warm-up: Before stretching, it’s important to warm up your muscles. This can be done by taking a brisk walk or doing some light aerobic exercise for five to ten minutes.
- Dynamic stretching: Dynamic stretching involves active movements that increase range of motion and help to prepare the muscles for activity. Examples of dynamic stretches include leg swings, arm circles, and hip rotations.
- Static stretching: Static stretching involves holding a stretch for a period of time to elongate the muscle. This type of stretching is best done after the warm-up and after the bikepacking trip. Examples of static stretches include toe touches, hamstring stretches, and calf stretches.
- Focus on major muscle groups: When stretching, focus on the major muscle groups used during bikepacking, such as the legs, hips, and back. Hold each stretch for 15-30 seconds and repeat two to three times.
- Breathing: Breathe deeply and slowly during stretching to help relax the muscles and increase flexibility.
Overall, incorporating stretching into your physical preparation routine can help to improve your bikepacking performance and reduce the risk of injury.
Nutrition and Hydration
Proper nutrition and hydration are essential components of physical preparation for bikepacking. These two factors can greatly impact the performance and endurance of a bikepacker during their journey.
Importance of Proper Nutrition and Hydration
Adequate nutrition and hydration are critical for maintaining energy levels, preventing dehydration, and avoiding fatigue during bikepacking. Without proper nutrition and hydration, a bikepacker may experience a decline in physical performance, impaired cognitive function, and an increased risk of injury or illness.
Best Foods for Bikepacking
Choosing the right foods for bikepacking is crucial for sustaining energy levels and maintaining proper nutrition. Some of the best foods for bikepacking include:
- High-carbohydrate foods such as energy gels, bars, and drinks to provide quick energy boosts
- Protein-rich foods such as nuts, seeds, and jerky to support muscle recovery and repair
- Hydrating foods such as fruits and vegetables to maintain hydration levels
Hydration Strategies for Bikepacking
Staying hydrated is critical during bikepacking, especially in hot and humid conditions. Bikepackers should aim to drink at least 500-1000 ml of water per hour during their journey. Other hydration strategies for bikepacking include:
- Carrying at least two liters of water per hour of riding
- Drinking electrolyte-rich sports drinks or coconut water to replace lost minerals
- Eating hydrating foods such as fruits and vegetables to maintain hydration levels
- Avoiding alcohol and caffeine, which can dehydrate the body
Overall, proper nutrition and hydration are essential components of physical preparation for bikepacking. By incorporating these strategies into their journey, bikepackers can sustain their energy levels, prevent dehydration, and avoid fatigue, ultimately enhancing their overall performance and enjoyment of the journey.
Equipment and Gear
Choosing the Right Bike
When it comes to bikepacking, choosing the right bike is crucial to ensure a comfortable and successful journey. Here are some factors to consider when selecting a bike for bikepacking:
- Frame material: The frame material is an essential factor to consider. The most common materials used for bike frames are carbon fiber, aluminum, and steel. Each material has its own advantages and disadvantages. Carbon fiber frames are lightweight and durable, but they can be expensive. Aluminum frames are lighter than steel frames and are also more affordable. Steel frames are robust and can handle rough terrain, but they are heavier than aluminum and carbon fiber frames.
- Geometry: The geometry of the bike is also essential. The bike’s geometry affects its handling, stability, and comfort. When choosing a bike for bikepacking, it is essential to consider the bike’s reach, stack, and head tube angle. These factors will affect how the bike handles and how comfortable it is to ride.
- Tire clearance: Tire clearance is another critical factor to consider. Bikepacking routes often take you through challenging terrain, and you may need to use wider tires for better traction. Make sure the bike you choose has enough clearance to accommodate the tires you plan to use.
- Suspension: Suspension is also essential for a comfortable ride. Bikes with suspension forks and rear shocks can absorb more of the rough terrain, making for a smoother ride. If you plan to use your bike for long distances or rough terrain, consider choosing a bike with suspension.
- Weight: The weight of the bike is also a significant factor. A lighter bike is easier to handle and more comfortable to ride, especially when you are carrying a heavy load. However, keep in mind that a lighter bike may not be as durable as a heavier one.
When it comes to choosing a bike for bikepacking, there are several types of bikes suitable for the activity. Here are some of the most popular types of bikes used for bikepacking:
- Mountain bikes: Mountain bikes are designed for off-road riding and are suitable for bikepacking on rough terrain. They have wide tires, suspension forks, and a lower bottom bracket for better stability and control.
- Gravel bikes: Gravel bikes are designed for riding on unpaved roads and gravel paths. They have wider tires and a more upright riding position than road bikes, making them ideal for bikepacking on varied terrain.
- Cyclocross bikes: Cyclocross bikes are similar to road bikes but have wider tires and more versatile geometry. They are suitable for bikepacking on pavement and dirt roads.
- Touring bikes: Touring bikes are designed for long-distance riding and are suitable for bikepacking on paved and unpaved roads. They have a comfortable upright riding position, multiple water bottle mounts, and luggage carriers for carrying gear.
In conclusion, choosing the right bike for bikepacking is crucial to ensure a comfortable and successful journey. Consider the bike’s frame material, geometry, tire clearance, suspension, and weight when making your selection. Mountain bikes, gravel bikes, cyclocross bikes, and touring bikes are some of the most popular types of bikes suitable for bikepacking.
Choosing the Right Gear
When it comes to bikepacking, choosing the right gear is crucial to ensure a safe and enjoyable trip. The following are some essential tips to help you choose the right gear for your bikepacking adventure:
Essential Gear for Bikepacking
- Bike: Choose a bike that is suitable for the terrain you will be riding on. A bike with suspension is recommended for rough terrain, while a hardtail or a cyclocross bike is suitable for more stable surfaces.
- Helmet: Wearing a helmet is essential for safety reasons. It protects your head from injuries in case of a fall or accident.
- Clothing: Dress in layers, as the temperature can vary throughout the day. Make sure to wear comfortable and breathable clothing that will keep you dry and warm.
- Hydration system: Staying hydrated is essential during bikepacking trips. Carry at least two liters of water with you and consider investing in a hydration system that allows you to drink while riding.
- First aid kit: A first aid kit is essential in case of any injuries or accidents. Make sure to include bandages, gauze, adhesive tape, tweezers, and any other necessary items.
- Navigation tools: Make sure to bring a map, compass, or GPS device to help you navigate the terrain.
- Repair kit: Bring a repair kit that includes tools for basic repairs, such as a multi-tool, tire patches, and tubes.
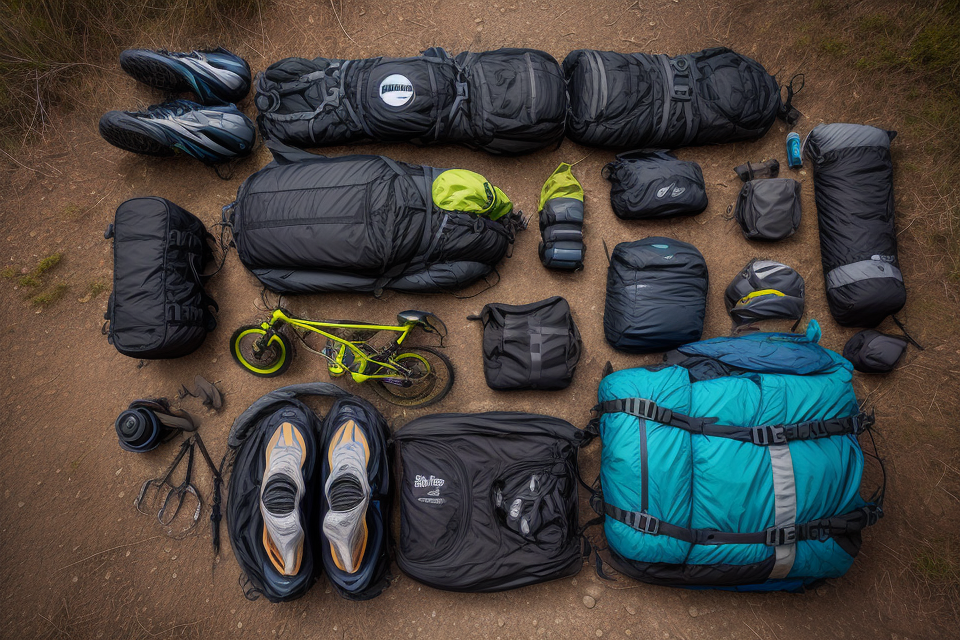
Packing List for Bikepacking
Here is a packing list that you can use as a guide when preparing for your bikepacking trip:
- Bike (suitable for the terrain)
- Helmet
- Clothing (layers)
- Hydration system
- First aid kit
- Navigation tools
- Repair kit
- Bike lock
- Food and snacks
- Shelter (tent or bivy sack)
- Sleeping bag or pad
- Cooking stove and fuel
- Cookware and utensils
- Water purification system
- Personal hygiene items (toothbrush, toothpaste, etc.)
- Sunglasses and sunscreen
- Insect repellent
- Flashlight or headlamp
- Bike lights (front and rear)
- Multi-tool
- Spare parts (tubes, tires, etc.)
By following these essential tips and tricks, you can ensure that you have the right gear for your bikepacking adventure. Remember to choose gear that is suitable for the terrain and that fits your needs and preferences. With the right gear, you can focus on enjoying the ride and exploring the great outdoors.
Bike Maintenance
- Importance of Regular Maintenance
Bike maintenance is an essential aspect of bikepacking. Regular maintenance helps ensure that your bike is in good working condition, which can prevent breakdowns and injuries. By taking care of your bike, you can also extend its lifespan and keep it running smoothly for years to come.
- Basic Bike Maintenance Skills
There are several basic bike maintenance skills that every bikepacker should know. These include:
Changing a Flat Tire
Changing a flat tire is one of the most common bike maintenance tasks. To change a flat tire, follow these steps:
- Move your bike to a safe location, away from traffic.
- Use a tire lever to loosen the tire bead from the rim.
- Remove the tire and tube from the rim.
- Inspect the tire and tube for damage and replace them if necessary.
- Reinstall the tire and tube onto the rim, ensuring that the bead is seated properly.
- Inflate the tire to the recommended pressure.
Adjusting the Derailleurs
Adjusting the derailleurs is important to ensure that your bike shifts smoothly and correctly. To adjust the derailleurs, follow these steps:
- Shift the bike into the largest cog or smallest chainring.
- Use a derailleur adjustment tool to adjust the rear derailleur.
- Use a derailleur adjustment tool to adjust the front derailleur.
- Shift the bike into the smallest cog or largest chainring and verify that the shifting is correct.
Lubricating the Chain
Lubricating the chain is important to reduce friction and wear on the drivetrain. To lubricate the chain, follow these steps:
- Use a chain cleaning and lubrication tool to clean and lubricate the chain.
- Make sure to lubricate the chain regularly, especially before long rides.
By learning these basic bike maintenance skills, you can keep your bike in good condition and avoid mechanical issues while bikepacking.
FAQs
1. What physical fitness level is required for bikepacking?
Bikepacking can be enjoyed by people of varying fitness levels, but it’s important to be in good physical condition to endure the demands of the activity. This typically means being able to ride a bike for long distances, carrying a heavy pack, and navigating rough terrain. It’s always a good idea to consult with a doctor before starting any new physical activity, especially if you have any pre-existing medical conditions.
2. What type of bike is best for bikepacking?
The type of bike that’s best for bikepacking depends on the specific route and terrain you’ll be riding. Generally, a mountain bike or a gravel bike with wide tires and good suspension is a good choice. A bike with racks and bags to carry gear is also necessary. Some bikepacking routes can be completed on a road bike, but it’s important to have the proper gear and be prepared for the rougher sections of the route.
3. What gear is essential for bikepacking?
The gear you’ll need for bikepacking will vary depending on the length and difficulty of the route, as well as the weather conditions. Some essential items to include in your pack are a good quality tent, sleeping bag, stove, cooking pot, food, water, first aid kit, repair tools, and a communication device. It’s important to pack only what you need and to test your gear before setting out on your trip.
4. How do you train for bikepacking?
Training for bikepacking involves building endurance, strength, and flexibility. This can be achieved through a combination of cycling, strength training, and stretching. It’s important to gradually increase the intensity and duration of your training over time to avoid injury. Try to incorporate some long rides into your training schedule to build up your endurance, and include some hill climbs and technical terrain to prepare for the challenges you’ll face on your bikepacking route.
5. What should you eat and drink during a bikepacking trip?
Eating and drinking enough during a bikepacking trip is essential for maintaining energy and staying hydrated. Aim to consume at least 2-3 liters of water per day, and bring snacks such as energy bars, fruit, and nuts to keep your energy levels up. Make sure to pack food that is easy to eat on the go and doesn’t require much preparation. It’s also a good idea to bring some high-calorie, high-protein foods to help refuel after a long day of riding.