Are you ready to hit the trails and explore the great outdoors on your bike? Before you go, you’ll need to figure out where to store all of your gear. In this guide, we’ll show you the best bikepacking bags and accessories to help you pack everything you need for your adventure. Whether you’re a seasoned bikepacker or a newbie, we’ve got you covered with tips and recommendations for choosing the right gear. So, get ready to ride with confidence, knowing that your gear is secure and easily accessible.
What is Bikepacking?
A Brief Overview
Bikepacking is a type of cycling that combines the thrill of mountain biking with the freedom of camping. It involves riding a mountain bike or gravel bike equipped with specialized bags and accessories that allow you to carry all the gear you need for an overnight or multi-day trip.
Bikepacking routes often take you through remote and rugged terrain, providing a unique and immersive experience in nature. You can explore everything from quiet forest trails to challenging singletrack, all while carrying only what you need on your bike.
The gear you choose for bikepacking is critical to your success and enjoyment of the trip. In the following sections, we’ll discuss the key factors to consider when choosing bikepacking bags and accessories, including the type of gear you need, how to attach it to your bike, and how to pack it efficiently.
Why Bikepacking is Popular
Bikepacking has gained popularity in recent years for several reasons. It combines the benefits of cycling and backpacking, allowing individuals to explore remote areas while carrying only essential gear. Here are some reasons why bikepacking has become increasingly popular:
- Low Impact Exercise: Cycling is a low-impact exercise that is easy on the joints and can be done by people of all ages and fitness levels. It is also a great way to explore the outdoors and see new places.
- Versatility: Bikepacking can be done on a variety of terrains, from dirt roads to singletrack trails, making it a versatile and exciting way to explore the outdoors.
- Efficient: Bikepacking allows individuals to carry more gear than they would on a traditional cycling trip, but still less than traditional backpacking trips. This makes it an efficient way to explore remote areas and camp in the wilderness.
- Adventure: Bikepacking provides a sense of adventure and excitement that is hard to find in other forms of outdoor recreation. The combination of physical activity and the freedom of exploring new places makes it a thrilling experience.
- Environmentally Friendly: Bikepacking is a sustainable and environmentally friendly way to explore the outdoors. It produces no emissions and has a lower impact on the environment than other forms of outdoor recreation.
Overall, bikepacking has become popular because it offers a unique and exciting way to explore the outdoors while being environmentally friendly and providing a sense of adventure.
Essential Bikepacking Gear
Clothing and Personal Items
When it comes to bikepacking, the gear you bring with you can make or break your trip. While the right bike and equipment are crucial, your clothing and personal items should not be overlooked. In this section, we will discuss the essential clothing and personal items to consider when planning your next bikepacking adventure.
Types of Clothing to Consider:
- Outerwear: Depending on the weather conditions, you may need to bring multiple layers of outerwear. A good rule of thumb is to bring at least one layer more than you think you will need. Consider bringing a waterproof and breathable jacket, as well as a lightweight fleece or sweater.
- Middle Layers: Middle layers such as long-sleeve shirts, shorts, or leggings can help regulate your body temperature. Choose materials that wick moisture away from your skin to keep you dry and comfortable.
- Base Layers: Moisture-wicking base layers, such as T-shirts or tank tops, are essential for keeping you dry and comfortable. They can also help prevent chafing and rashes.
- Cold-Weather Gear: If you’re planning a trip in colder weather, you’ll need to bring additional clothing items such as gloves, hats, and insulated layers.
Personal Items to Consider:
- Sleeping Bag: Depending on the climate and altitude of your destination, you may need to bring a sleeping bag. Choose a bag rated for the lowest temperature you expect to encounter.
- Tent: A lightweight and compact tent is essential for shelter. Choose a tent that is easy to set up and take down, and that offers enough space for you and your gear.
- Bedroll: A bedroll is a soft, lightweight, and compact blanket that can be used as a bed or for warmth. It’s a good idea to bring a bedroll for added comfort and warmth.
- Cooking Gear: If you plan on cooking your own meals, you’ll need to bring a stove, fuel, pots, pans, and utensils. Choose lightweight and compact gear that is easy to pack and use.
- First Aid Kit: A basic first aid kit can be essential in case of accidents or injuries. Make sure to include items such as bandages, gauze, tweezers, and pain relievers.
- Navigation Tools: Depending on the terrain and the length of your trip, you may need to bring navigation tools such as a compass, map, and GPS device.
- Personal Hygiene Items: Toilet paper, wet wipes, and biodegradable soap are essential for personal hygiene. Bring enough to last for the duration of your trip.
Storage Solutions:
- Bikepacking Bags: Bikepacking bags are designed to attach to your bike and provide secure storage for your gear. Choose bags that are compatible with your bike and that offer enough storage space for your clothing and personal items.
- Dry Bags: Dry bags are waterproof bags that can be used to store clothing and personal items. Choose bags that are large enough to hold your gear but small enough to be easily carried on your bike.
- Frame Bags: Frame bags are small bags that attach to the frame of your bike and provide easy access to your gear. They are ideal for storing items such as snacks, first aid kits, and navigation tools.
- Backpack: If you’re planning a trip that requires more than a day’s worth of gear, a backpack can be a convenient way to carry your
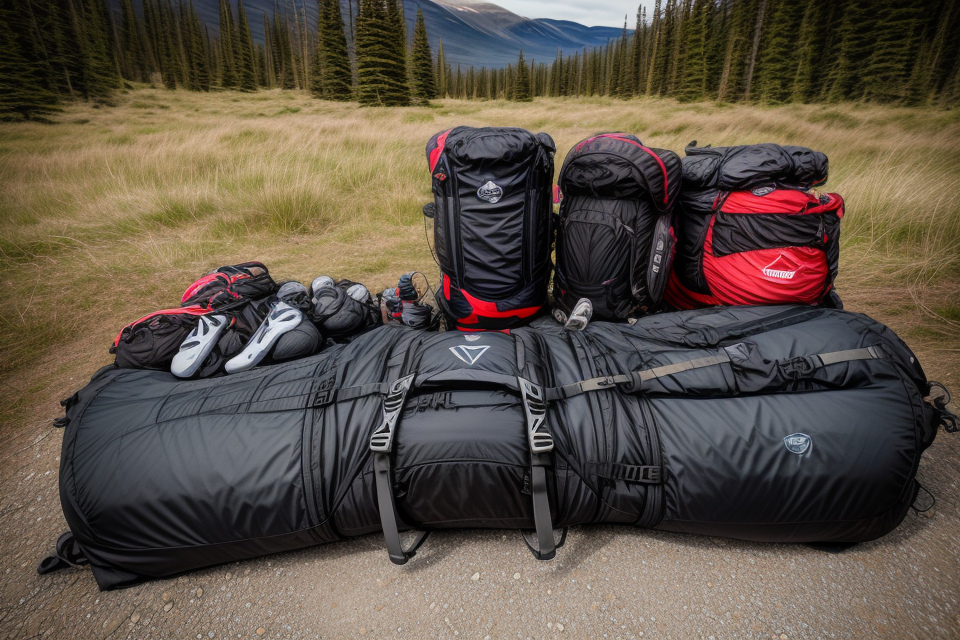
Bikepacking Bags
Bikepacking bags are a crucial component of any bikepacking setup. These bags are designed to attach to the bike and provide a convenient way to carry essential gear, food, and water. When choosing bikepacking bags, it’s important to consider the following factors:
Capacity
The capacity of a bikepacking bag refers to the amount of gear it can hold. It’s important to choose a bag that has enough capacity to hold all the gear you need for your trip. If you’re going on a long trip, you’ll need a larger bag with more capacity.
Location
Bikepacking bags can be located in different places on the bike. The most common locations are the front, rear, and top tube. The location of the bag will depend on the type of bikepacking you’re doing and the amount of gear you need to carry.
Type of Bag
There are several types of bikepacking bags, including frame bags, handlebar bags, seat bags, and luggage-style bags. Each type of bag has its own advantages and disadvantages, so it’s important to choose the right type of bag for your needs.
Material
The material of a bikepacking bag is also an important consideration. The material should be durable and able to withstand the elements. Common materials include canvas, Cordura, and vinyl.
Mounting System
The mounting system of a bikepacking bag is the way it attaches to the bike. Some bags use straps, while others use brackets or buckles. The mounting system should be easy to use and secure.
Weight
Weight is also an important consideration when choosing bikepacking bags. The weight of the bag should be light enough not to slow you down, but sturdy enough to hold your gear.
Overall, when choosing bikepacking bags, it’s important to consider the type of bikepacking you’ll be doing, the amount of gear you need to carry, and the location of the bag on the bike. With the right bikepacking bags, you can ensure that your gear is secure, accessible, and convenient on your next bikepacking adventure.
Bike Accessories
Bike accessories play a crucial role in bikepacking, as they not only provide comfort but also help to protect your bike and gear. Some essential bike accessories for bikepacking include:
- Bike Locks: Bike locks are essential for securing your bike when you’re not using it. There are different types of bike locks available, including U-locks, chain locks, and cable locks. It’s important to choose a lock that is durable and difficult to cut or break.
- Bike Pumps: Bike pumps are essential for inflating your tires and maintaining the correct tire pressure. There are different types of bike pumps available, including floor pumps and mini pumps. It’s important to choose a pump that is easy to use and provides accurate pressure readings.
- Bike Lights: Bike lights are essential for visibility when riding in low light conditions. There are different types of bike lights available, including front lights, rear lights, and battery-powered lights. It’s important to choose lights that are bright and durable, and that provide a wide beam angle for maximum visibility.
- Bike Mirrors: Bike mirrors are essential for visibility and safety when riding. There are different types of bike mirrors available, including bar-end mirrors and helmet mirrors. It’s important to choose mirrors that provide a wide field of view and are easy to adjust.
- Bike Racks: Bike racks are essential for carrying additional gear, such as camping equipment or spare clothing. There are different types of bike racks available, including rear racks, front racks, and fork mount racks. It’s important to choose a rack that is durable and compatible with your bike.
In addition to these essential bike accessories, there are many other accessories that can enhance your bikepacking experience. These may include water bottle holders, bell, horn, or other smaller accessories.
Choosing the Right Bikepacking Bags and Accessories
Factors to Consider
When it comes to choosing the right bikepacking bags and accessories, there are several factors to consider. These factors will help you determine what type of gear is best suited for your specific needs and preferences.
- Type of Ride: The type of ride you plan to take will play a significant role in determining the type of gear you need. For example, if you plan to take a multi-day tour, you will need different gear than if you are just going for a short day ride.
- Terrain: The terrain you will be riding on will also play a role in determining the type of gear you need. If you plan to ride on rough terrain, you will need gear that can withstand the wear and tear.
- Weather Conditions: The weather conditions you will be riding in will also play a role in determining the type of gear you need. If you plan to ride in wet or cold conditions, you will need gear that is designed to keep you dry and warm.
- Personal Preferences: Your personal preferences will also play a role in determining the type of gear you need. For example, if you prefer to carry a certain type of food or drink, you will need gear that can accommodate that.
- Budget: Lastly, your budget will also play a role in determining the type of gear you can afford. Bikepacking gear can range from budget-friendly options to high-end, high-performance gear. It’s important to consider your budget when making your selection.
Bikepacking Bag Types
When it comes to bikepacking, the type of bag you choose is crucial to the success of your trip. There are several types of bikepacking bags available, each designed for a specific purpose. In this section, we will discuss the most common types of bikepacking bags and their features.
Saddle Bags
Saddle bags are the most popular type of bikepacking bag. They are designed to be attached to the top tube of the bike and are usually made of waterproof materials. Saddle bags are ideal for carrying essential items such as a tent, sleeping bag, and food. They are also easy to access while riding and can be quickly removed when not in use.
Handlebar Bags
Handlebar bags are designed to be attached to the handlebars of the bike. They are typically smaller than saddle bags and are ideal for carrying items such as a camera, wallet, and phone. Handlebar bags are easy to access while riding and can be quickly removed when not in use.
Frame Bags
Frame bags are designed to be attached to the frame of the bike. They are usually made of waterproof materials and are ideal for carrying items such as a spare tube, tools, and extra clothing. Frame bags are easy to access while riding and can be quickly removed when not in use.
Seat Packs
Seat packs are designed to be attached to the seat post of the bike. They are typically larger than saddle bags and are ideal for carrying items such as a tent, sleeping bag, and food. Seat packs are easy to access while riding and can be quickly removed when not in use.
Panniers
Panniers are designed to be attached to the rear of the bike. They are typically larger than other types of bikepacking bags and are ideal for carrying a large amount of gear. Panniers are easy to access while riding and can be quickly removed when not in use.
Each type of bikepacking bag has its own unique features and benefits. It is important to consider the type of trip you are planning and the items you will need to carry when choosing the right bikepacking bags and accessories.
Bike Accessory Options
When it comes to bikepacking, the right accessories can make all the difference in terms of comfort, convenience, and safety. From water bottles and bike lights to mirrors and bells, there are a wide variety of options to choose from.
Water Bottles
One essential accessory for any bike ride is a water bottle. There are many different types of water bottles available, including aluminum, plastic, and insulated options. Consider the size, material, and insulation of the water bottle based on your personal preferences and the conditions of your ride.
Bike Lights
Bike lights are another important accessory for bikepacking, especially if you plan to ride in low-light conditions or at night. There are many different types of bike lights available, including front lights, rear lights, and combination lights that provide both front and rear illumination. Consider the brightness, battery life, and mounting options of the bike lights based on your personal needs and the conditions of your ride.
Mirrors
Mirrors are a useful accessory for bikepacking, as they allow you to keep an eye on the road behind you and avoid potential hazards. There are many different types of bike mirrors available, including helmet-mounted, handlebar-mounted, and seatpost-mounted options. Consider the mounting location, field of view, and adjustability of the bike mirror based on your personal preferences and the conditions of your ride.
Bells
Bells are another useful accessory for bikepacking, as they allow you to alert others to your presence and communicate your intentions. There are many different types of bike bells available, including classic bell designs and electronic options that provide a more customizable sound. Consider the volume, tone, and mounting options of the bike bell based on your personal preferences and the conditions of your ride.
Other Accessories
In addition to the above accessories, there are many other options available for bikepacking, including cargo racks, bags, and storage solutions. Consider the size, weight, and compatibility of these accessories based on your personal needs and the conditions of your ride. With the right accessories, you can ensure a safe, comfortable, and convenient bikepacking experience.
Top Bikepacking Routes for Your Next Adventure
The Great Divide Mountain Bike Route
The Great Divide Mountain Bike Route is one of the most popular and challenging bikepacking routes in the world. It spans over 2,700 miles (4,500 km) from Canada to Mexico, passing through some of the most spectacular landscapes in the United States.
Route Description
The Great Divide Mountain Bike Route (GDMBR) is a dirt road route that follows the Continental Divide, a mountain range that runs from Alaska to Mexico. The route passes through the Rocky Mountains, the Great Plains, and the Sierra Madre Occidental mountain range. It is primarily composed of gravel roads, dirt roads, and some sections of singletrack trails.
Best Time to Ride
The best time to ride the GDMBR is from late spring to early fall, typically from late May to mid-September. During this time, the weather is usually dry and the roads are in good condition. However, it’s important to note that weather conditions can vary significantly along the route, so it’s essential to be prepared for all kinds of weather conditions.
Gear and Equipment
Riding the GDMBR requires a significant amount of gear and equipment. Here are some essentials:
- Bike: A mountain bike with front suspension is recommended, as the route includes some rough and rugged terrain.
- Tires: Large volume, tubeless tires with high puncture resistance are ideal for the diverse terrain.
- Gearing: A wide range of gears is recommended for the various climbs and descents.
- Hydration: A water filter or purification system is necessary for refilling water along the route.
- Navigation: A GPS or a good map and compass is essential for navigating the route.
- Clothing: Lightweight, breathable, and moisture-wicking clothing is recommended, as well as warm layers for the cold mountain nights.
- Shelter: A lightweight and compact tent or tarp is necessary for camping along the route.
- Food: High-calorie, non-perishable food is recommended for fueling during the ride.
- First Aid: A basic first aid kit is essential for any unexpected injuries or emergencies.
Permits and Regulations
The GDMBR passes through several federal and state lands, so it’s important to obtain the necessary permits and follow the regulations. Here are some key permits and regulations to be aware of:
- Bicycle permits are required for some sections of the route, such as Yellowstone National Park and Glacier National Park.
- Camping is allowed in most areas along the route, but it’s important to follow Leave No Trace principles and obtain any necessary permits.
- Fire restrictions may be in place during dry periods, so it’s important to check local regulations before starting a fire.
- Wildlife encounters are common along the route, so it’s important to respect their habitat and follow any guidelines for wildlife safety.
Overall, the GDMBR is an incredible adventure for experienced bikepackers looking for a challenge. With proper planning, preparation, and respect for the environment, riders can experience the breathtaking beauty of the American West while pushing their physical and mental limits.
The Arizona Trail
The Arizona Trail is a world-renowned bikepacking route that spans over 800 miles across the state of Arizona. This trail offers a diverse range of terrain, from rugged desert landscapes to dense forests and towering mountains.
Some of the highlights of the Arizona Trail include:
- The Grand Canyon: The trail passes near the Grand Canyon, providing breathtaking views of this natural wonder.
- Saguaro National Park: The trail also passes through Saguaro National Park, which is home to the iconic saguaro cactus.
- Mogollon Rim: The trail follows the Mogollon Rim, a high, narrow ridge that offers stunning views of the surrounding landscape.
- Apache Trail: The trail also includes a section along the historic Apache Trail, which was used by Native American tribes and early settlers.
Bikepackers on the Arizona Trail can expect to encounter a variety of challenges, including rugged terrain, extreme temperatures, and potentially dangerous wildlife. It’s important to be well-prepared and have the right gear for this route.
Some recommended bikepacking bags and accessories for the Arizona Trail include:
- Ready-to-ride bikepacking bags: These bags are designed to be easily attached and removed from your bike, making it easy to access your gear while on the go.
- Water bottle holders: With the hot temperatures in Arizona, it’s important to stay hydrated. Water bottle holders make it easy to carry and access water on the go.
- Frame bags: Frame bags are a great option for carrying additional gear, such as spare parts, tools, and extra clothing.
- Multi-tool: A multi-tool is an essential tool for any bikepacking trip, and can be used for a variety of repairs and adjustments on the go.
By choosing the right bikepacking bags and accessories, you can ensure that you’re well-prepared for the challenges of the Arizona Trail and ready to embark on an unforgettable adventure.
The Trans-Alaska-Canada Adventure Route
- The Trans-Alaska-Canada Adventure Route is a challenging and rewarding bikepacking route that spans over 3,000 miles across some of the most remote and beautiful wilderness areas in North America.
- The route starts in Anchorage, Alaska and takes you through the rugged and stunning terrain of the Alaskan interior, including the historic Iditarod Trail, before crossing into the Yukon Territory and then into British Columbia.
- As you cycle through the Canadian Rockies, you’ll encounter a diverse range of landscapes, from the towering peaks and glaciers of the Alaska Range to the dense forests and alpine meadows of the Pacific Northwest.
- The route also passes through several small towns and villages, providing opportunities to resupply and connect with local communities.
- Wildlife viewing is a highlight of this route, with opportunities to spot grizzly bears, wolves, moose, and other wildlife in their natural habitats.
- The route can be completed in 2-3 weeks, depending on your pace and fitness level, and requires a high degree of self-sufficiency, preparation, and experience in off-road cycling and wilderness camping.
- Bikepacking bags and accessories that are well-suited for this route include durable and waterproof bikepacking bags, a reliable tent and sleeping system, a sturdy and comfortable bike, and navigation and communication tools.
Additional Resources for Planning Your Bikepacking Trip
There are many resources available to help you plan your bikepacking trip. Here are a few of the most useful ones:
- Bikepacking.com: This website is dedicated to all things bikepacking, and is a great resource for finding routes, gear reviews, and trip reports.
- The Bikepacking Journal: This online magazine features in-depth articles on a variety of bikepacking topics, as well as stunning photography and inspiring stories.
- Strava: This social networking site for athletes is a great place to find and connect with other bikepackers, and to share tips and advice.
- The Bikepacking Podcast: Hosted by a group of experienced bikepackers, this podcast features interviews with guests, gear reviews, and discussion of all things bikepacking.
- Bikepacking Routes: This website features a growing collection of curated bikepacking routes from around the world, complete with detailed maps, route descriptions, and photos.
These resources can help you find the best routes, plan your trip, and connect with other bikepackers. With the right gear and a little bit of planning, you’ll be ready to hit the trails and start your next adventure.
Tips for Safe and Enjoyable Bikepacking
Preparing for Your Trip
Before you embark on your bikepacking adventure, it’s important to properly prepare for your trip. Here are some essential tips to help you get started:
- Plan Your Route: Research the route you plan to take and make sure it’s within your skill level. Consider factors such as terrain, weather, and availability of water and food.
- Check Your Bike: Make sure your bike is in good working condition and that all components are properly functioning. It’s also a good idea to pack a basic tool kit and spare parts.
- Pack Your Gear: Choose the right bikepacking bags and accessories to fit your needs. Consider the weight, size, and durability of the gear you plan to bring. It’s also important to consider how the gear will be secured to your bike.
- Test Your Gear: Before setting off on your trip, test all of your gear to make sure it’s working properly. Make any necessary adjustments or repairs.
- Stay Safe: Be aware of your surroundings and take necessary precautions to stay safe. This includes wearing appropriate clothing and protective gear, as well as carrying necessary safety equipment such as a first aid kit and a light source.
By following these tips, you can ensure that your bikepacking trip is safe and enjoyable. Remember to always prioritize safety and to properly prepare for your adventure.
On the Trail
When it comes to bikepacking, the gear you bring with you can make or break your trip. Properly storing your gear is essential for both safety and enjoyment on the trail. Here are some tips for safe and enjoyable bikepacking:
- Keep your gear organized: A well-organized pack can save you time and energy on the trail. Consider investing in bikepacking-specific bags that are designed to keep your gear organized and easily accessible.
- Distribute your weight evenly: To ensure a comfortable ride, distribute your weight evenly between your bike and your body. Avoid carrying heavy loads on one side of your bike or on your back, as this can cause imbalances and discomfort.
- Protect your gear from the elements: The elements can be harsh on your gear, so it’s important to protect it from the elements. Consider investing in waterproof bags or covers to keep your gear dry, and use a tarp or shelter to protect your gear from the sun or rain.
- Keep your gear accessible: It’s important to be able to access your gear quickly and easily while on the trail. Consider investing in bikepacking-specific bags that are designed to be easily accessible while riding.
- Stay safe: Always prioritize safety when bikepacking. Make sure to bring necessary safety gear, such as a first aid kit, and be aware of your surroundings at all times.
In Case of Emergencies
When embarking on a bikepacking adventure, it’s crucial to be prepared for any unforeseen circumstances that may arise. Here are some tips to ensure you’re ready for emergencies while on the trail:
- Bring a basic repair kit: This should include items such as tire patches, a pump, a multi-tool, and any specific tools for your bike.
- Carry a first aid kit: Ensure you have a well-stocked first aid kit with essentials like bandages, gauze, adhesive tape, and pain relievers.
- Have a communication device: Bring a working mobile phone or a two-way radio to keep in touch with others and seek help if needed.
- Dress appropriately: Wear layers of clothing that can be easily removed or added, depending on the weather conditions. This will help you adapt to changing weather and keep you comfortable.
- Know your limits: It’s essential to be aware of your physical limitations and not push yourself too hard. This will help you avoid exhaustion and injury.
- Travel with a buddy: Cycling with a partner can be more enjoyable and safer. Having someone to share the experience with can also provide added motivation and support.
- Share your plans: Before setting off, inform a trusted friend or family member of your intended route, expected return date, and emergency contact details. This will ensure someone knows where to find you if you don’t return on time.
- Pack emergency food and water: Carry enough food and water to last for at least one extra day, in case you get lost or encounter unexpected delays.
- Learn basic navigation skills: Familiarize yourself with basic navigation techniques, such as using a compass and map, to help you stay on track and avoid getting lost.
- Have a backup plan: Always have a backup plan in case your ride doesn’t go as planned. This might include alternative routes, accommodation options, or backup transportation.
FAQs
1. What types of bags are recommended for bikepacking?
There are several types of bags that are suitable for bikepacking, including frame bags, handlebar bags, seat bags, and saddle bags. Frame bags are mounted to the frame of the bike and provide a large storage space for bulky items. Handlebar bags are smaller and more versatile, allowing for easy access to small items while riding. Seat bags are designed to be attached to the seat post and provide a convenient place to store small items. Saddle bags are similar to seat bags but are mounted to the underside of the saddle.
2. How do I choose the right size of bikepacking bag?
When choosing the right size of bikepacking bag, it’s important to consider the amount of gear you plan to bring. Generally, larger bags are better suited for longer trips, while smaller bags are better for shorter trips or day rides. It’s also important to consider the size and shape of your bike, as well as the type of terrain you’ll be riding on. You want to make sure that the bags you choose won’t interfere with your ability to ride or steer your bike.
3. Are there any specific accessories that are recommended for bikepacking?
Yes, there are several accessories that can make bikepacking more comfortable and convenient. A good quality water bottle holder is essential for keeping hydrated on longer rides. A bell or horn can be helpful for alerting other riders and pedestrians to your presence. A multitool can come in handy for making quick repairs on the trail. A phone mount or handlebar mount can be useful for navigating or taking photos and videos. And a quality set of bike lights can be essential for riding in low light conditions or at night.
4. How do I properly pack my gear for bikepacking?
Properly packing your gear for bikepacking is essential for ensuring a comfortable and safe ride. Start by packing the heaviest items in the bottom of the bags, such as your tent or sleeping bag. Next, pack items that you’ll need access to frequently, such as snacks and extra clothing, in smaller bags or pockets. Finally, pack the remaining items, such as bike tools and spare parts, in smaller bags or pouches. Make sure to distribute the weight evenly across your bike and avoid overloading any one bag or area.